            var xml = @"
<Invoice>
    <Timestamp>1/1/2017 00:01</Timestamp>
    <CustNumber>12345</CustNumber>
    <AcctNumber>54321</AcctNumber>
</Invoice>";Posts tagged with 'Couchbase Server'
This is a repost that originally appeared on the Couchbase Blog: XML to JSON conversion with Json.NET.
XML data can be converted to JSON, which can be loaded into Couchbase Server (Couchbase Server 5.0 beta now available). Depending on the source of the data, you might be able to use a tool like Talend. But you may also want to write a simple C# .NET application with Newtonsoft’s Json.NET to do it.
XML data
For the purposes of this tutorial, I’m going to use a very simple XML example. If your XML is more complex (multiple attributes, for instance), then your approach will also have to be more complex. (Json.NET can handle all XML to Json conversions, but it follows a specific set of conversion rules). Here’s a sample piece of data:
Notice that I’ve got this XML as a hardcoded string in C#. In a real-life situation, you would likely be pulling XML from a database, a REST API, XML files, etc.
Once you have the raw XML, you can create an XmlDocument object (XmlDocument lives in the System.Xml namespace).
XmlDocument doc = new XmlDocument();
doc.LoadXml(xml);
Conversion with Json.NET
Once you have an XmlDocument object, you can use Json.NET to convert that object into a Json representation.
var json = JsonConvert.SerializeXmlNode(doc, Formatting.None, true);In this example, I’m asking Json.NET to serialize an XML node:
-
I used
Formatting.None. If I wanted to display the actual Json, it might be better to useFormatting.Indented -
The last
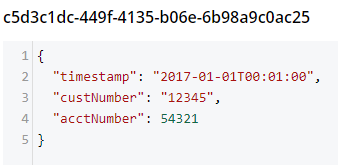
truespecifies that I want to omit the root object. In the XML above, you can think of<Invoice></Invoice>as the root object. I just want the values of the Invoice object. If I didn’t omit the root node, the resultant Json would look like:{"Invoice":{"Timestamp":"1/1/2017 00:01","CustNumber":"12345","AcctNumber":"54321"}}
Saving the Json result
Finally, let’s put the Json into Couchbase. The easiest way to do this would be to again call on JsonConvert to deserialize the Json into a C# object. That object would then be used with Couchbase’s bucket.Insert(…) method.
object transactObject1 = JsonConvert.DeserializeObject(json);
bucket.Insert(Guid.NewGuid().ToString(), transactObject1);
With this method, the Json would be stored in Couchbase like so:

That might be fine, but often times you’re going to want more control of the format. With Json.NET, we can serialize to a given class, instead of just object. Let’s create an Invoice class like so:
public class Invoice
{
    public DateTime Timestamp { get; set; }
    public string CustNumber { get; set; }
    public int AcctNumber { get; set; }
}
Notice that there is some type information now. The Timestamp is a DateTime and the AcctNumber is an int. The conversion will still work, but the result will be different, according to Json.NET’s conversion rules. (Also check out the full Json.NET documentation if you aren’t familiar with it already).
Invoice transactObject2 = JsonConvert.DeserializeObject<Invoice>(json);
bucket.Insert(Guid.NewGuid().ToString(), transactObject2);
The result of that insert will look like:
-
Notice that the timestamp field is different: it’s stored in a more standardized way.
-
The acctNumber field value is not in quotes, indicating that it’s being stored as a number.
-
Finally, notice that the field names are different. This is due to the way Json.NET names Json fields by default. You can specify different names by using the
JsonPropertyattribute.
That’s it
One more minor thing to point out: I used Guid.NewGuid().ToString() to create arbitrary keys for the documents. If you have value(s) in the XML data that you want to use for a key, you could/should use those value(s) instead.
This blog post was inspired by an email conversation with a Couchbase user. If you have any suggestions on tools, tips, or tricks to make this process easier, please let me know. Or, contact me if there’s something you’d like to see me blog about! You can email me or contact me @mgroves on Twitter.
This is a repost that originally appeared on the Couchbase Blog: Documentation Contribution and Improvements.
Documentation is undergoing some changes for the better at Couchbase. Matt Carabine and the documentation team have been working to improve the build process, backporting, and review. And, they have made it easier to contribute to documentation in the process.
Contributing to the documentation
Couchbase documentation is open source, but until recently, there were a number of problems. If you were looking to make a substantial change or maybe just fix a quick typo, you were faced with one or more of these questions:
-
Where do I look to make a change?
-
What file do I change?
-
What file maps to the doc page I’m looking at?
-
How do I change it?
It was not always clear how to go from a documentation URL to a specific file in the Github repository.
Now, that’s changed. If you visit a page in the documentation, you will notice an "Edit on GitHub" link on each page. Click this link and you’ll be taken to GitHub to edit the file directly (your first time, you will be prompted to create a fork).
Example
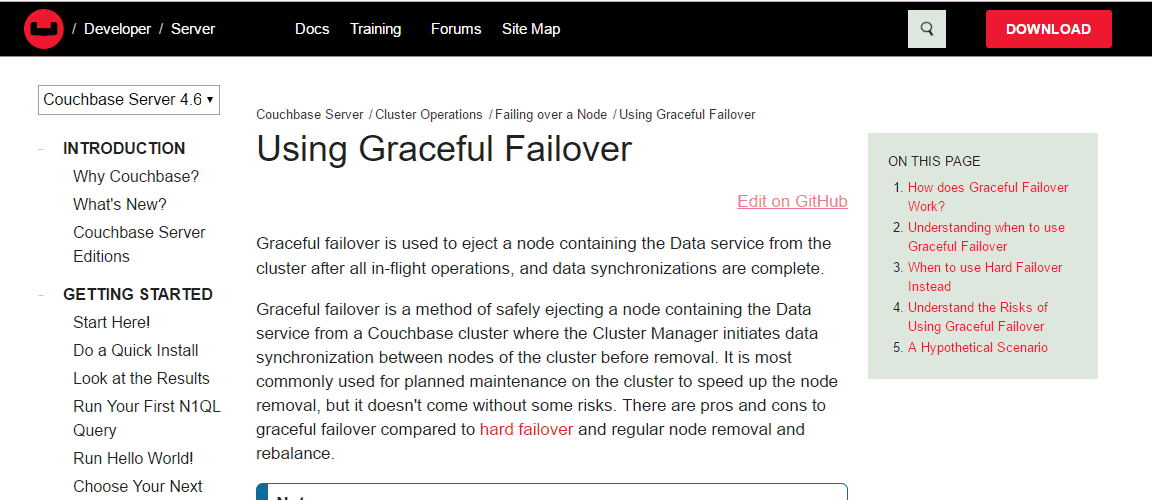
First, visit the Using Graceful Failover page in the documentation.
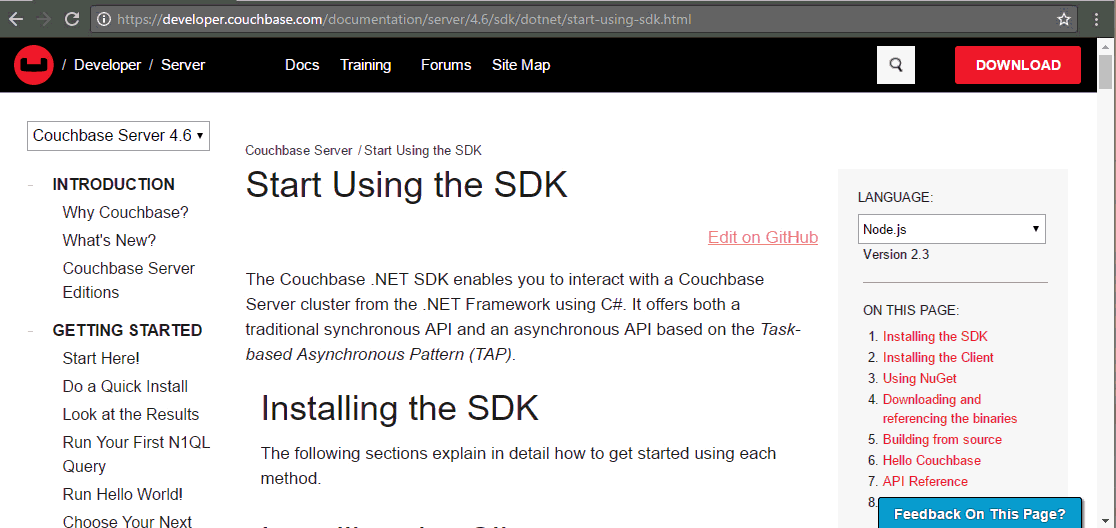
Next, click the "Edit on GitHub" link.
At this point, you’re on GitHub. Assuming you’ve used Git/GitHub before, the rest of this process should be familiar.
If you’ve not already created a fork, you will be prompted to do so.
After that, you will see an edit screen where you can make your change.
Once you’ve made a change, click the "Propose file change". You’ll see a diff, and you’ll be able to create a pull request.
Contribution guide
That’s a crash course on contributing to the documentation. There’s a full guide on how to contribute to Couchbase Server docs.
Note that while that guide is written in Markdown, Couchbase Server documentation is written in the Darwin Information Typing Architecture (DITA) markup language.
For simple typo corrections, you may not need to know much about DITA, but for deeper edits, you will need to familiarize yourself with the syntax and/or an editing tool like Oxygen.
Documentation contributions
Thank you to those in the community who have already contributed! This new system has only been going for a few months, but we’ve already gotten some great contributions. So I tip my hat to:
-
eunosm3 for #1180 - better shortdesc for manage caching layer architecture
-
atom992 for #1365 - correcting a flag for cbexport
-
Sir4ur0n for #1366 - fixing a N1QL typo
-
ptorsson for #1414 - correcting some Go SDK examples
-
MarkTickner for #1457 - adding docs for the REST API services parameter
-
ecejnj42 for #1585 - fixing misplaced options in durability area
-
rabdill for #1632 - fixing a typo in Go N1QL examples
-
GauthamBanasandra for #1696 - fixing some grammer in the subdocuments area
-
oxyrax for #1725 - correcting a setting for cbbackupmgr
It astounds me that we had such great contributions from so many people so quickly! Thank you, everyone, for helping to make the documentation better.
How did we get here?
To make contribution easier, the build process had to be improved. Previously, it involved a bunch of manual steps: pull source, build locally, zip up the results, FTP them to a server, run one or more slow build server tasks manually. Now you’ll see that the build step happens much more quickly in the pull request, and previews are generated quickly.
The reviewing of content was also improved. Previously, previews were only possible on a single location. There was no simultaneous reviewing possible. This, combined with the slow, manual builds, was frustrating, and made it difficult to review all changes, let alone external ones.
Finally, backporting to other versions of Couchbase Server documentation was also a problem. The documentation is stored in separate branches for each version, so if an issue is raised and fixed in 4.6, it may also apply to 4.5, and so on. That’s a very manual process, but a @cb-docs-robot was created to automate the backporting (which you’ll see in many of the above examples).
How are we doing?
Another thing we’ve added is the ability to give us feedback on the documentation right from your browser.
Simply find the "Feedback On This Page" button at the bottom right of your browser, click it, and write feedback.
Summary
These documentation improvements help us both internally and externally. We hope that it will make your experience with the documentation less frustrating and more enjoyable. We welcome your feedback! Please check out the Couchbase docs on GitHub.
This is a repost that originally appeared on the Couchbase Blog: Tooling Improvements in Couchbase 5.0 Beta.
Tooling improvements have come to Couchbase Server 5.0 Beta. In this blog post, I’m going to show you some of the tooling improvements in:
-
Query plan visualization - to better understand how a query is going to execute
-
Query monitoring - to see how a query is actually executing
-
Improved UX - highlighting the new Couchbase Web Console
-
Import/export - the new cbimport and cbexport tooling
Some of these topics have been covered in earlier blog posts for the developer builds (but not the Beta). For your reference:
Query Plan Visualization tooling
In order to help you write efficient queries, the tooling in Couchbase Server 5.0 has been enhanced to give you a Visual Query Plan when writing N1QL queries. If you’ve ever used the Execution Plan feature in SQL Server Management Studio, this should feel familiar to you.
As a quick example, I’ll write a UNION query against Couchbase’s travel-sample bucket (optional sample data that ships with Couchbase Server). First, I’ll click "Query" to bring up the Couchbase Query Workbench. Then, I’ll enter a query into the Query Editor.
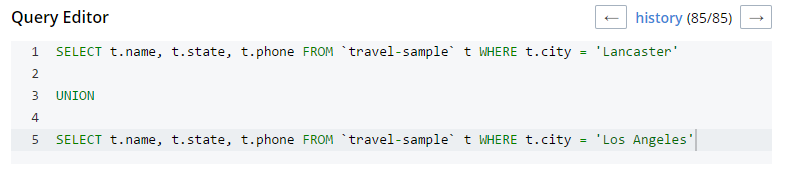
This is a relatively complex query that involves the following steps (and more):
-
Identify and scan the correct index(es)
-
Fetch the corresponding data
-
Project the fields named in the
SELECTclause -
Find distinct results
-
UNIONthe results together -
Stream the results back to the web console
In Couchbase Server 4.x, you could use the EXPLAIN N1QL command to get an idea of the query plan. Now, in Couchbase Server 5.0 beta, you can view the plan visually.
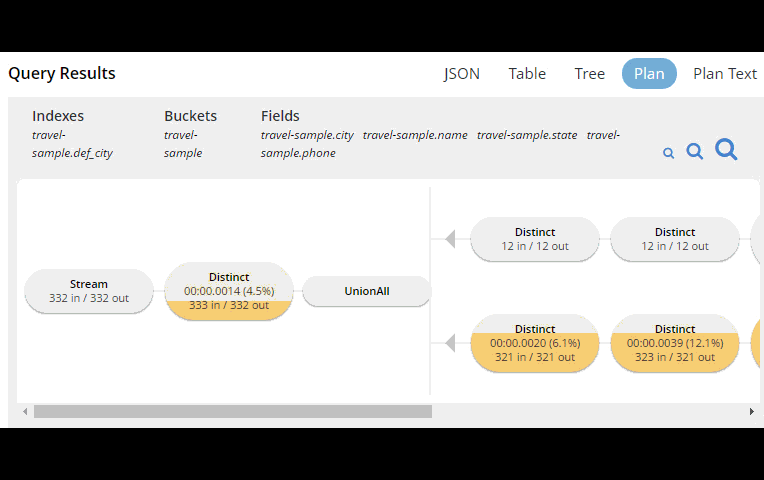
This tooling shows you, at a glance, the costliest parts of the query, which can help you to identify improvements.
Query monitoring
It’s important to have tooling to monitor your queries in action. Couchbase Server 5.0 beta has tooling to monitor active, completed, and prepared queries. In addition, you have the ability to cancel queries that are in progress.
Start by clicking "Query" on the Web Console menu, and then click "Query Monitor". You’ll see the "Active", "Completed", and "Prepared" options at the top of the page.
Let’s look at the "Completed" queries page. The query text and other information about the query is displayed in a table.

Next, you can sort the table to see which query took the longest to run (duration), return the most results (result count), and so on. Finally, if you click "edit", you’ll be taken to the Query Workbench with the text of that query.
New Couchbase Web Console
If you’ve been following along, you’ve probably already noticed the new Couchbase Web Console. The UI has been given an overhaul in Couchbase Server 5.0. The goal is to improve navigation and optimize the UI.
This new design maximizes usability of existing features from Server 4.x, while leaving room to expand the feature set of 5.0 and beyond.
cbimport and cbexport
New command line tooling includes cbimport and cbexport for moving data around.
cbimport supports importing both CSV and JSON data. The documentation on cbimport should tell you all you want to know, but I want to highlight a couple things:
-
Load data from a URI by using the
-d,--dataset <uri>flags -
Generate keys according to a template by using the
-g,--generate-key <key_expr>flags. This gives you a powerful templating system to generate unique keys that fit your data model and access patterns -
Specify a variety of JSON formats when importing: JSON per line (
lines), JSON list/array (list), JSON ZIP file/folder containing multiple files (sample). So no matter what format you receive JSON in, cbimport can handle it.
For more about cbimport in action, check out Using cbimport to import Wikibase data to JSON documents.
cbexport exports data from Couchbase to file(s). Currently, only the JSON format is supported. Again, the documentation on cbexport will tell you what you want to know. A couple things to point out:
-
Include the document key in your export by using the
--include-key <key>flag. -
Export to either "lines" or "list" format (see above).
Here’s an example of cbexport in action (I’m using Powershell on Windows, but it will be very similar on Mac/Linux):
PS C:\Program Files\Couchbase\Server\bin> .\cbexport.exe json -c localhost -u Administrator -p password -b mybucketname -f list -o c:\exportdirectory\cbexporttest.json --include-key _id

Json exported to `c:\exportdirectory\cbexporttest.json` successfully

PS C:\Program Files\Couchbase\Server\bin> type C:\exportdirectory\cbexporttest.json

[
{"_id":"463f8111-2000-48cc-bb69-e2ba07defa37","body":"Eveniet sed unde officiis dignissimos.","type":"Update"},
{"_id":"e39375ab-2cdf-4dc4-9659-6c19b39e377d","name":"Jack Johnston","type":"User"}
]
Notice that the key was included in an "_id" field.
Summary
Tooling for Couchbase Server 5.0 beta is designed to make your life easier. These tools will help you whether you’re writing queries, integrating with data, monitoring, or performing administrative tasks.
We’re always looking for feedback. Inside of the Web Console, there is a feedback icon at the bottom right of the screen. You can click that to send us feedback about the tooling directly. Or, feel free to leave a comment below, or reach out to me on Twitter @mgroves.
This is a repost that originally appeared on the Couchbase Blog: Logging with Log4Net and Common Logging.
Logging with Common.Logging, log4net, and the Couchbase .NET SDK is demonstrated in this video.
The source code for the logging example used in this video is available on Github.
For more information about logging, check out the logging documentation on the developer portal.
If you have questions or feedback, please contact me at [email protected], or on @mgroves at Twitter, or just leave a comment below.
This is a repost that originally appeared on the Couchbase Blog: Authentication and Authorization with RBAC in .NET.
Authentication and authorization are vastly improved in Couchbase Server 5.0. We’ve been blogging about the new RBAC features in the developer preview for a while.
-
Authentication and Authorization with RBAC - introduction / part 1
-
Authentication and Authorization with RBAC (Part 2) - managing users
-
Improved SDK Authentication Methods - Couchbase 5.0 - an introduction featuring Python, Java, PHP, and .NET
Now that Couchbase Server 5.0 is released, I’m writing a more in-depth blog post about how to use the Couchbase .NET SDK along with these new features.
The full code samples used in this blog post are available for you on Github.
Create a bucket
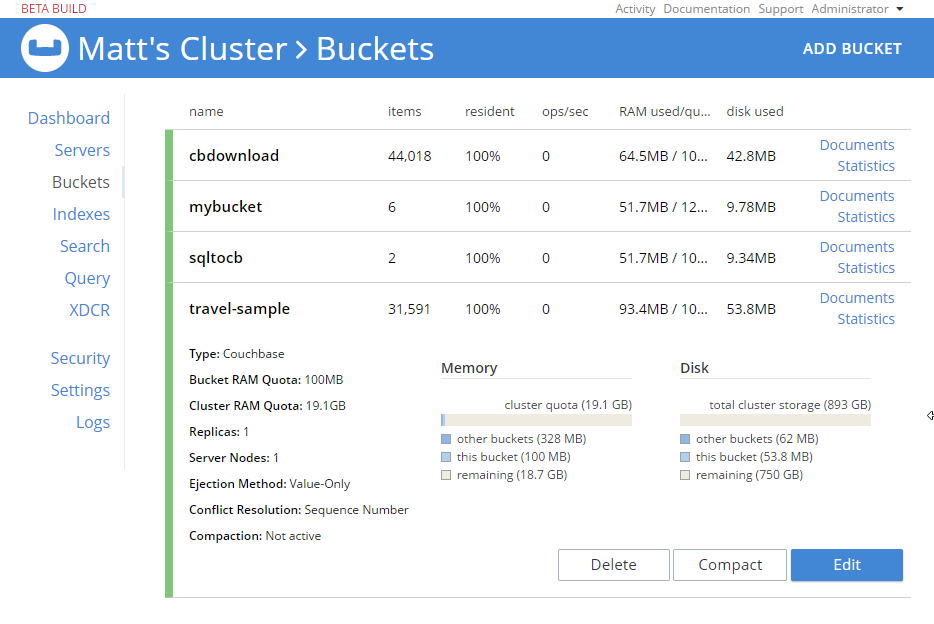
As I mentioned in the previous posts, the days of buckets with passwords are gone. The future belongs to users—users that have specific permission(s) to specific bucket(s).
Let’s start by creating a bucket. In the Couchbase UI, login as the Administrator that you created when you installed Couchbase. Go to "Buckets" and click "ADD BUCKET" (top right). You will see the "Add Data Bucket" dialog. Notice that there is no longer a "password" field (not even in "Advanced bucket settings").

Give the bucket a name and some amount of memory, and click "Add Bucket". Now you have a bucket. But, other than an Administrator in the UI, no one can access this bucket yet.
Create a user
In order to get access to this bucket, you must create a user. In Couchbase 5.0, "users" are an entirely new feature, bringing richer authentication and authorization features to Couchbase Server.
While still logged in as an administrator, go to "Security" to see a list of users. Click "ADD USER" (top right).
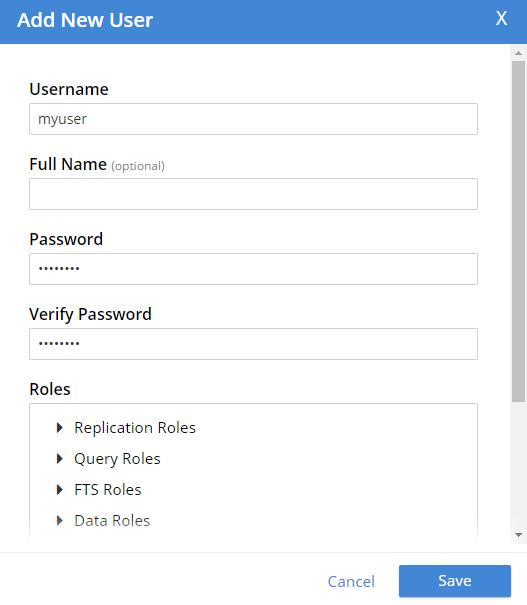
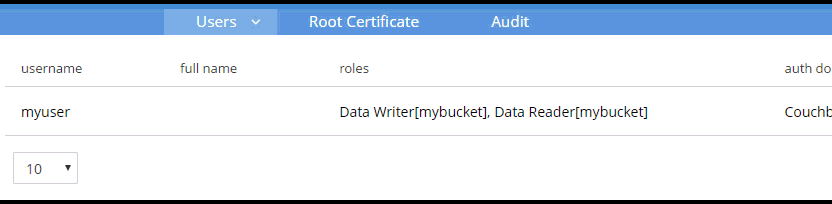
Create a user with whatever name and password you’d like. You can choose which roles the user has, and for which buckets (when applicable). Let’s give this user Data Writer and Data Reader roles, for the bucket that was just created (e.g. "mybucket"), but NOT any Query roles.
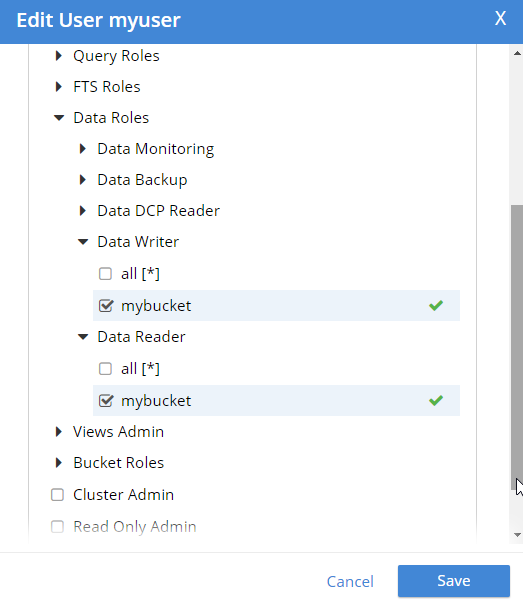
Once the user is added, you can hover over the roles to get a description of what the role means.
Authentication and authorization with the Couchbase .NET SDK
Now that we have a bucket and a user, let’s see how to use them with the .NET SDK.
Start by creating a Cluster object.
var cluster = new Cluster(new ClientConfiguration
{
    Servers = new List<Uri> { new Uri("http://localhost:8091") }
});
You have a cluster, but your program has not been authenticated yet. Use a PasswordAuthenticator object to specify the credentials. Then, use that object with the cluster’s Authenticate method. In this example below, I’m using incorrect credentials.
var authenticator = new PasswordAuthenticator("myuser", "wrongpassword");
cluster.Authenticate(authenticator);
Now, if I try to perform an operation like OpenBucket on the cluster, an exception is thrown.
try
{
    var bucket = cluster.OpenBucket("mybucket");
}
catch (Exception ex)
{
    Console.WriteLine("Error getting bucket.");
    Console.WriteLine(ex.Message);
}
Now, let’s try it again using the correct credentials. Authentication will work. But let’s talk about authorization next.
Remember that I only gave this user Data Writer and Data Reader roles (for mybucket). So, if I authenticate and insert a document now, it works.
var cluster = new Cluster(new ClientConfiguration
{
    Servers = new List<Uri> { new Uri("http://localhost:8091") }
});
var authenticator = new PasswordAuthenticator("myuser", "password");
cluster.Authenticate(authenticator);
var bucket = cluster.OpenBucket("mybucket");

// insert a document, this should be allowed
var result = bucket.Insert(Guid.NewGuid().ToString(), new {foo = "bar"});
Console.WriteLine("Insert was successful: " + result.Success);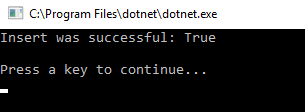
But if I tried to, for instance, execute a N1QL (SQL for JSON) query, then it would fail. This is because that user is not authorized to execute queries.
var queryResult = bucket.Query<int>("SELECT COUNT(1) FROM `" + bucket.Name + "`");
Console.WriteLine("Query was successful: " + queryResult.Success);
queryResult.Errors.ForEach(e => Console.WriteLine("Error: " + e.Message));
I’m just doing a simple COUNT(1) aggregation query. Since that user is not authorized, here’s what’s displayed:

One more thing
If you are worried about the effect this will have on upgrading from Couchbase Server 4.x to Couchbase Server 5.0, then here’s a tip. If you create a user with the same name as the bucket (e.g. a bucket called "foo" and a user named "foo"), then the older Couchbase .NET APIs that still expect a bucket password will work as before. Just give that user a "Cluster Admin" role for now. This is a good temporary fix until you can re-engineer your system to use a regimented approach to role.
Summary
Couchbase Server 5.0 is out now in beta! These role-based authentication (RBAC) features make Couchbase a leader in document database security, and I’m personally very pleased that Couchbase is going in this direction. Security is important, but too often overlooked by developers.
If you have any questions, please ask away in the Couchbase Forums, leave a comment below, or ping me on Twitter @mgroves.
